I do love sprinkles, but I can't afford to spend that kind of money on simple sugar shapes.
So I set out to make my own, figuring it couldn't be that hard. And I came up with a method that will give you a nice selection of simple shapes, using stuff you probably have in your kitchen. You won't need any special equipment for most of them. And by "special equipment", I mean "rolling pin". I used an empty wine bottle and it worked out perfectly.
To make a long story short, the solution is rolled fondant. It's easy to work with, can be dyed in many shades and can be stored almost indefinitely. The resulting texture is more similar to that of jimmies (i.e. soft), but I actually liked that. The sprinkles will still hold their shape and after trying mine for the first time last week, I can safely say that they do not melt into the icing, despite being relatively soft. However, if you want crunchier sprinkles, you can simply dry them longer or even put them in the oven overnight at a low temperature.
The key with these is to be creative with what you have on hand; Certain piping tips, cookie cutters, straws, some toys (try the Barbie kitchen) and scrap-booking or polymer clay tools can all be used, provided they are safe to use with food. And if you don't have any of these things, a big chef's knife is really all you need to get started.
And now, without further ado, here's how to make sprinkles.
And now, without further ado, here's how to make sprinkles.
Step 1: Preparing the fondant
I don't know about you, but I don't particularly like the taste of fondant. I always add some kind of extract. I've used lemon, orange and almond extract in the past with great results. Just add a few drops and knead them into the fondant. Feel free to skip this step if you don't mind the taste.
The next step is to dye your fondant. If you want to make different colors of sprinkles at once, my advice is to do only one color at a time, starting with the lightest color. You will inevitably get a lot of food coloring on your hands and this way the lighter colors won't get tainted. I usually start with white and proceed with yellow, green, red and blue, in that order. This time, I only made yellow fondant.
Food coloring gel or powder works best, but they are quite strong. Add just a little bit at a time, mix well, then add more if you want a deeper shade. You won't need much. This is the amount of food coloring you'll need for a nice yellow.

Step 2: Rolling out the fondant
If you have one of those fondant rolling mats, good for you. I don't. So I used non-stick baking parchment. Wax paper would probably work equally well. Just put your ball of fondant between two sheets of paper and roll it out. Try to get it to become as thin as possible. Peel off the top paper frequently, put it back on the fondant, then flip the "sandwich" and peel off the bottom paper, too, reapplying it before you continue rolling. It makes it easier to end up with a smooth surface.
If you want to use edible glitter, apply it now. I used body glitter in gold, because that's what I had. It says on the box that it's meant to be licked off the skin, so the amount you ingest by eating a few sprinkles is definitely safe. If you want your sprinkles to be extra shiny, you can apply a layer of very thin royal icing (I'd use royal icing made with meringue powder instead of raw egg whites, for safety reasons). If you do, let it dry a little before you cut out your sprinkles.
Step 3: Cutting out shapes
Squares, Triangles and Diamonds:
These are by far the easiest shapes to make. All you do is roll out the fondant, then cut it into strips right on the wax paper (press the knife down into the fondant instead of doing the normal cutting/slicing motion; You'll get straighter edges that way). Then rotate your knife 90° (for squares) or 45° (for diamonds) and cut again. Make sure you cut all the way through the fondant, otherwise your sprinkles may stick to each other and you will have to break them apart later on. This technique makes a lot of sprinkles in a short period of time and you have the greatest control over their size. I made mine fairly big this time, about .5 cm (1/5 inch).

Circles:
For these, you will have to make an ejector cutter. Don't worry, it's very simple and takes seriously 30 seconds to make (probably less). You need a straw and a lollipop stick that fits comfortably inside the straw (a long wooden pick works well as long as it has a blunt end). Your stick shouldn't be too thin! Cut the straw to approximately 6 inches. Put the lollipop stick/wooden pick inside the straw. That's it.
Now, with one hand, press the end of the straw into the fondant. Twist it gently. Your other hand holds the lollipop stick/wooden pick (=ejector). Make sure the tip of your ejector doesn't touch the fondant or you'll get an indentation in the center of your circle.

The little circle will probably get stuck inside the straw. Now push down the ejector. Your sprinkle will just fall out.

Repeat until you have enough.

Instead of a straw, you can use a round piping tip. The technique remains the same.
Nonpareils:
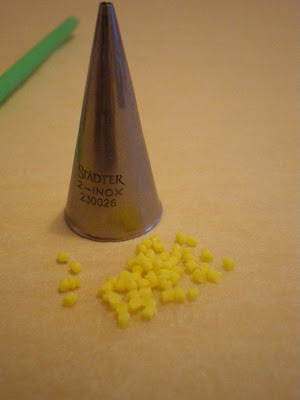
Nonpareils are made with the same technique as circles. Just use the smallest round tip you can find (mine is 2 mm), then push the nonpareil out with the pointy end of a toothpick or long wooden pick. These nonpareils won't be perfectly round, of course, but they work well nonetheless (and let's face it, who looks at their sprinkles and complains that they're not perfect spheres.). If you want to make rainbow nonpareils, let them dry completely before you combine the different colors.

Crescents:
Again, the technique is the same as making circles. The only difference is that instead of cutting each circle next to the previous one, you only move the cutter over about half a circle before you cut again (I don't know how else to put it, so if you have a better explanation, I'd be glad to include it).

The ejection technique is the same, of course. I just removed the stick for the picture.
I suggest using a bigger straw/round tip for this (I used 6 mm), because the smaller the cutter, the harder it will be to tell you were trying to make crescents.

Jimmies:
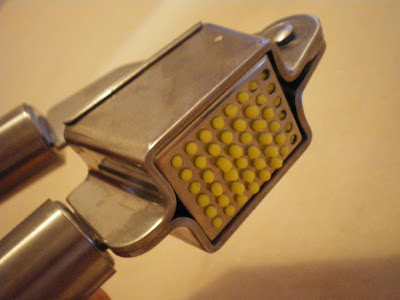
Jimmies are easy. All you need is a garlic press, preferably one with a removable insert (easier to clean). Put a little ball of fondant inside and press. When the jimmies have reached the length you like, cut/scrape them off with a flat knife. Repeat with new fondant balls.

Alternatively, you could make a very thick royal icing, put it into a piping bag and pipe lines onto a piece of parchment paper using a very small round tip or a multi-opening tip (Wilton tips #42, 89 or 134). Cut the lines into short pieces.

Tear drops:
The cutter you need for these is a little more difficult to make than the round one. This time, you'll need to invest about 5 minutes of your time. You need a piece of medium thick plastic (craft store or certain food packages). Cut out a rectangular piece of plastic, about 2,5x10 cm (1x4 inches). Pinch together the edges of the longer sides and secure them with a piece of clear tape. You'll end up with a 4-inch straw with openings in the form of a tear drop. Insert the blunt end of a wooden pick. This will be your ejector.
Cut out tear drops using the same technique you used with the circles.

Of course, if you have a decorating tip with a tear-shaped opening, by all means use that. I don't, unfortunately.
"Special shapes":
Unfortunately, I haven't come up with a way to make flowers, hearts or stars that don't rely on store-bought ejector cutters. So if you don't have any, you won't be able to make these. I included them here anyway, because they technically fit the term "homemade sprinkles".

The good news is that these ejector cutters aren't too expensive (between 9 and 19 Euros for a set of 3 or 4, respectively). However, the cutters small enough to make sprinkles only come in 4 shapes- heart, star, flower and clover. I only have the star and flower cutters.

I've mentioned above that you can also use cutters intended for use with polymer clay. Get these if you want. Not only are they cheaper than the kind produced specifically for fondant, the smallest size they come in is perfect for sprinkles.
To dry your sprinkles, simply leave them out on the parchment paper for a few days (depending on the humidity in your area). Alternatively, you can preheat your oven to 50°C (120°F), turn it off and put in the sprinkles on cookie sheets lined with parchment paper. Leave them in overnight. Store the dry sprinkles in screw-top jars or similar air-tight containers.
This is it. Easy, no? Now go ahead and make some sprinkles. Tomorrow I'll try to make tiny orange slice sprinkles. If it works, I'll let you know how to do it.

No comments:
Post a Comment