Friday, September 11, 2009

Amerikaner


This is a food blog, as I'm sure you've noticed. And while a food blog is great fun and does serve a purpose, let's face it. Food blogs are kinda shallow compared to some of the other things that are out there. Which is okay, you gotta have a place to go and forget your problems for a little while.
But today is September 11th and since this is the first year I have a blog, I can't resist writing about it and sharing my story.

On September 11th, 2001, I was 16 years old. I had just started my Junior year as an exchange student in Napa, California (I had originally planned on spending my year abroad at a school located in Tribeca, but I didn't get in). I had been living in the US for 3 weeks.
It was a Tuesday. When I came out of my room that morning, the TV was on, which wasn't really all that unusual, except that instead of cartoons, there were the twin towers on the screen. It was the first time I had ever seen or heard of the World Trade Center. What a short acquaintance it would be.
I watched the first tower come down. I didn't realize what was happening.
Then we had to get to school. On the way there, in the car, we were listening to the radio.
The second tower collapsed. Nobody knew what to say, least of all I.
We watched TV all day at school. We were incredulous. I do remember a girl in first period saying that she thought Osama bin Laden was responsible, which I still find kind of odd.
This was the first time I ever heard of the guy.
My dad was scheduled to go to New York that day and I tried to get a hold of him all day. That's when I learned that you can't call Europe from most high schoolers' cell phones. The office finally managed to get him on the phone in the afternoon. There had been a minor work emergency that had caused him to miss his flight.
You know, I didn't grow up in a religious family. We're very secular. But that day, I really did believe that someone was looking out for my family. Still do, actually.
Over the following hours, days, weeks, even years, as more footage was published, we all saw things nobody forgot easily. People jumping out of the burning towers' windows, priests reading the last rites to those dying on stretchers just outside the buildings, fire fighters crying like infants.
I also experienced something great, though. American patriotism is oftentimes ridiculed in Europe. We find it naive at best, and maybe we're just a little jealous because we don't have it (the closest we got was during the soccer world cup of 2006). Especially during the first few months after the attacks, the outpour of patriotism was amazing. And they were so inclusive. As long as you weren't against America, no matter where you were from, you were accepted. We all had a common enemy, and despite all our differences (somehow, the Foreign Exchange Student seems to be one of the great stereotypes Americans love to entertain), we were similar enough all of a sudden to make living there easy for me and it brought the whole school closer together.
Just goes to show that sometimes good things can come from great evils.

I went to New York in the summer of 2002, when cab drivers had resumed honking at each other and most people had moved on with their lives. Still, the city was changed.

I went again last summer. Ground Zero is now a place where tourists go for sight-seeing and pose for pictures, huge smiles on their faces. I don't think they realize how inappropriate that is.
I didn't take pictures there, but I took the one at the beginning of this post outside of a fire station. I didn't know Keith Roma, but I am grateful for his sacrifice. If you want to learn a little bit about him, go here.

So, to honor him and all the other people who died that day, I made a quintessential New York sweet: Black and white cookies.
We have a version of them here in Germany. They have either black (chocolate) or white (sugar) frosting and are called Amerikaner (Americans). I'm pretty sure they were introduced here by the American forces who were stationed in Germany until not too long ago. I've been making them for years.

Black and white cookies, a.k.a. bi-colored Amerikaner (adapted from "Komm koch und back mit mir", a German kids' cookbook)

  • 1 stick plus 1 tablespoon butter
  • 5/8 cup sugar
  • 1 egg
  • 1 tablespoon vanilla sugar
  • 3 tablespoons lemon juice (divided use)
  • 2 cups all-purpose flour
  • 2 tablespoons cornstarch
  • 1 teaspoon baking powder
  • a generous pinch of salt
  • 2.5 ounces milk chocolate
  • 2 ounces powdered sugar

  1. Mix flour, starch, baking powder and salt in a bowl, set aside. Preheat oven to 350°F/175°C.
  2. Cream butter and sugars until light and fluffy.
  3. Add the egg and 1 tablespoon lemon juice and mix to incorporate.
  4. Sift dry ingredients over wet ingredients, mix just until no dry streaks remain.
  5. Line a baking sheet with parchment paper. Using a cookie scoop that holds about a tablespoon, set balls of dough on the baking sheet. The cookies spread a lot, so make sure you don't put them too closely together. I usually get about 12 cookies per baking sheet, but my sheets are big.
  6. Bake the cookies for 9-12 minutes. They should be golden around the edges, but still light in the middle. They will be soft when they come out of the oven, but will set after a few minutes.
  7. Let the cookies cool briefly until they are safe to move. Transfer them to a cooling rack and let them cool completely, flat side down.
  8. When the Amerikaner are cool, melt the chocolate in a double boiler or in the microwave. Using a pastry brush, apply it to half of the flat side. Put the frosted cookies back on the rack to let the chocolate set.
  9. Sift the powdered sugar into a small bowl. Add 2 tablespoons lemon juice and whisk until you end up with a smooth, spreadable mixture. If it's too firm, add a few drops of water or lemon juice at a time, until you like the consistency.
  10. Spread the sugar frosting on the other half of the cookies' flat surface and let that set, too.

I apologize for the lack of pictures. My camera has finally refused to work anymore, and the new one I want isn't available until October. Don't let that stop you from making the cookies, though. They're really good.

Wednesday, August 12, 2009

Yay, I got gifts!


Remember I blogged about the awesome vanilla beans I ordered a few weeks ago? Well, apparently, the nice folks over at Vanille Shop found my post and wanted to thank me for the pimping ;-)
So they sent me the sweetest letter and a little package containing a tube of their vanilla beans in addition to their new products to try (they are currently working on expanding their product range).

I received two little glass jars, one containing vanilla sugar and the other powdered vanilla.
Unfortunately, both the beans' tube and the jar holding the vanilla sugar were broken when they arrived.

Memo to the Deutsche Post: When something is shipped in a padded envelope, it might be a good idea not to cram it into the mailbox through a 1.5-inch slit.

Just saying.

Anyway, it was fine. I kept some empty tubes from their last shipment, so I just moved the vanilla beans over to one of those. The vanilla sugar was a little more tricky, because it had shards of glass in it, but I sifted it using a very fine sieve and put it into a screw top jar.
So what now? I've decided to review each of the products separately, just to keep it organized.


First up, the vanilla beans:


I've written about their beans, so you already know they're great. These were just as plump, long and moist as the ones I received last time. These particular beans have a strong floral and fruity fragrance, which renders them perfect for the peach mousse pie I intend to make for my mom's birthday this Saturday.
The beans are winners and I don't think I will ever buy vanilla at the grocery store again. These are a great deal and the quality is much better than anything you can find in a store here (and that includes most organic foods stores). If you scrape out the seeds, you will end up with about four times the amount you would get from a grocery store bean.


Secondly, vanilla powder:


15 g of finely processed whole vanilla beans (not dehydrated!). Nothing added.
I like that they use whole vanilla beans for this, because while we usually only use the seeds, the beans themselves have a lot of flavor and using both really adds another layer to the final product. I've wanted to add whole vanilla beans in the past, but have you ever tried processing just one of those little suckers in the food processor? Yeah, don't. It doesn't work. That's where this powder really comes in handy.

This stuff smells so good, you have no idea. I've only had the jar for like 3 hours and I've already opened it about a dozen times to smell it. It smells sweet, with a slight caramel note and fruity undertones.

This product can be used in place of vanilla seeds in all desserts, but I would especially recommend this for any baked goods that do better with powdered spices. Macarons come to mind, because adding liquids (like vanilla extract) to the batter may very well ruin them (believe me, it's happened to me...).

Personally, I think the vanilla powder needs to be highlighted as the main flavor. I'm considering using it in marshmallows or vanilla pudding.

Unlike scraped vanilla seeds, this powder can be sprinkled. If you're into candy making, it would be great sprinkled on top of lighter chocolates.

I will definitely add this to my next order, I just love it so much. You really should do the same, but make sure you only order as much as you can use up in a few months, because ground spices typically lose their potency quicker than their whole counterparts.

Thirdly, the vanilla sugar:


Here in Germany, we usually use vanilla sugar in baking rather than vanilla extract, so most people keep little bags of it around. Well, actually, the most widely available thing is vanillin sugar, which contains fake vanilla.

This, however, is the real deal.
It's made from their vanilla bean powder and regular granulated sugar (not confectioners' sugar), whizzed to the consistency of fine powder. I like that there's no starch in it, because I feel starch dilutes the vanilla taste quite a lot and it adds a weird...well, starchy taste that I don't appreciate too much.

As I said, the jar broke and I had to sift the sugar to get rid of the glass, but I'm very happy to report that in spite of quite a bit of vanilla sugar being lost in the nooks and crannies of the envelope, I still ended up with 32 g after sifting (the original jar said it contained 30 g). So they definitely give you your money's worth.

While I was sifting out the pieces of glass, I was standing in a sweet cloud of sugary vanilla fragrance. This is good stuff. I have the broken jar on my desk right now and yes, I did wipe the inside clean with my finger (then licked the sugar off).
Did you really need to ask?


I like the sugar's slightly greyish, sandy color, which shows me that there's quite a lot of vanilla in there. You can see tons of individual vanilla specks as well.
The vanilla sugar tastes sweet (duh!) and has a very pronounced vanilla flavor. It's not grainy at all and readily dissolves on the tongue.

Powerful food processors aren't as prevalent in this country as they are in the States and making vanilla sugar of comparable quality without one is pretty hard. So if you don't own one, this product is a great solution.
I personally will probably not order this product, since I go through vanilla beans like it's my job and I make my own vanilla sugar. I would, however, recommend it to anyone who doesn't.

This is almost too good to be used in baking, so I'll probably use my little jar of sugar to dust some waffles or shortbread-like cookies.

I'm off to the kitchen now to use up some of my new goodies. Thank you, vanilla people, for your kind and generous gift!

Friday, July 24, 2009

Sprinkles Galore!

I love sprinkles of any kind. I already have a pretty nice collection of them and I'm always happy to find new ones. There's just one problem. Germany is a little bit behind when it comes to cake decorating and there really isn't much to choose from. Of course, rainbow and chocolate jimmies and nonpareils are widely available, but that's basically it in the sprinkle department. If you want more (or different colors), you have to order online or purchase from specialized baking stores (but those are hard to find. I live in Berlin and there's one that I know of). Needless to say, our sprinkles come in tiny packages and they are prohibitively expensive (as much as € 3 for about 1 ounce).
I do love sprinkles, but I can't afford to spend that kind of money on simple sugar shapes.

So I set out to make my own, figuring it couldn't be that hard. And I came up with a method that will give you a nice selection of simple shapes, using stuff you probably have in your kitchen. You won't need any special equipment for most of them. And by "special equipment", I mean "rolling pin". I used an empty wine bottle and it worked out perfectly.

To make a long story short, the solution is rolled fondant. It's easy to work with, can be dyed in many shades and can be stored almost indefinitely. The resulting texture is more similar to that of jimmies (i.e. soft), but I actually liked that. The sprinkles will still hold their shape and after trying mine for the first time last week, I can safely say that they do not melt into the icing, despite being relatively soft. However, if you want crunchier sprinkles, you can simply dry them longer or even put them in the oven overnight at a low temperature.

The key with these is to be creative with what you have on hand; Certain piping tips, cookie cutters, straws, some toys (try the Barbie kitchen) and scrap-booking or polymer clay tools can all be used, provided they are safe to use with food. And if you don't have any of these things, a big chef's knife is really all you need to get started.
And now, without further ado, here's how to make sprinkles.

Step 1: Preparing the fondant

I don't know about you, but I don't particularly like the taste of fondant. I always add some kind of extract. I've used lemon, orange and almond extract in the past with great results. Just add a few drops and knead them into the fondant. Feel free to skip this step if you don't mind the taste.

The next step is to dye your fondant. If you want to make different colors of sprinkles at once, my advice is to do only one color at a time, starting with the lightest color. You will inevitably get a lot of food coloring on your hands and this way the lighter colors won't get tainted. I usually start with white and proceed with yellow, green, red and blue, in that order. This time, I only made yellow fondant.
Food coloring gel or powder works best, but they are quite strong. Add just a little bit at a time, mix well, then add more if you want a deeper shade. You won't need much. This is the amount of food coloring you'll need for a nice yellow.


Step 2: Rolling out the fondant

If you have one of those fondant rolling mats, good for you. I don't. So I used non-stick baking parchment. Wax paper would probably work equally well. Just put your ball of fondant between two sheets of paper and roll it out. Try to get it to become as thin as possible. Peel off the top paper frequently, put it back on the fondant, then flip the "sandwich" and peel off the bottom paper, too, reapplying it before you continue rolling. It makes it easier to end up with a smooth surface.
If you want to use edible glitter, apply it now. I used body glitter in gold, because that's what I had. It says on the box that it's meant to be licked off the skin, so the amount you ingest by eating a few sprinkles is definitely safe. If you want your sprinkles to be extra shiny, you can apply a layer of very thin royal icing (I'd use royal icing made with meringue powder instead of raw egg whites, for safety reasons). If you do, let it dry a little before you cut out your sprinkles.

Step 3: Cutting out shapes

Squares, Triangles and Diamonds:
These are by far the easiest shapes to make. All you do is roll out the fondant, then cut it into strips right on the wax paper (press the knife down into the fondant instead of doing the normal cutting/slicing motion; You'll get straighter edges that way). Then rotate your knife 90° (for squares) or 45° (for diamonds) and cut again. Make sure you cut all the way through the fondant, otherwise your sprinkles may stick to each other and you will have to break them apart later on. This technique makes a lot of sprinkles in a short period of time and you have the greatest control over their size. I made mine fairly big this time, about .5 cm (1/5 inch).


Circles:
For these, you will have to make an ejector cutter. Don't worry, it's very simple and takes seriously 30 seconds to make (probably less). You need a straw and a lollipop stick that fits comfortably inside the straw (a long wooden pick works well as long as it has a blunt end). Your stick shouldn't be too thin! Cut the straw to approximately 6 inches. Put the lollipop stick/wooden pick inside the straw. That's it.
Now, with one hand, press the end of the straw into the fondant. Twist it gently. Your other hand holds the lollipop stick/wooden pick (=ejector). Make sure the tip of your ejector doesn't touch the fondant or you'll get an indentation in the center of your circle.


The little circle will probably get stuck inside the straw. Now push down the ejector. Your sprinkle will just fall out.


Repeat until you have enough.


Instead of a straw, you can use a round piping tip. The technique remains the same.

Nonpareils:
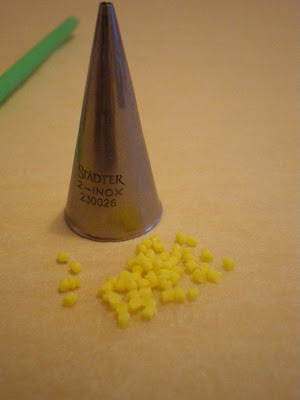
Nonpareils are made with the same technique as circles. Just use the smallest round tip you can find (mine is 2 mm), then push the nonpareil out with the pointy end of a toothpick or long wooden pick. These nonpareils won't be perfectly round, of course, but they work well nonetheless (and let's face it, who looks at their sprinkles and complains that they're not perfect spheres.). If you want to make rainbow nonpareils, let them dry completely before you combine the different colors.


Crescents:
Again, the technique is the same as making circles. The only difference is that instead of cutting each circle next to the previous one, you only move the cutter over about half a circle before you cut again (I don't know how else to put it, so if you have a better explanation, I'd be glad to include it).


The ejection technique is the same, of course. I just removed the stick for the picture.

I suggest using a bigger straw/round tip for this (I used 6 mm), because the smaller the cutter, the harder it will be to tell you were trying to make crescents.


Jimmies:
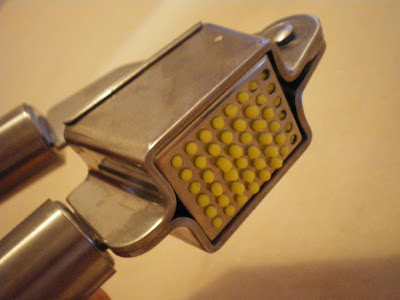
Jimmies are easy. All you need is a garlic press, preferably one with a removable insert (easier to clean). Put a little ball of fondant inside and press. When the jimmies have reached the length you like, cut/scrape them off with a flat knife. Repeat with new fondant balls.


Alternatively, you could make a very thick royal icing, put it into a piping bag and pipe lines onto a piece of parchment paper using a very small round tip or a multi-opening tip (Wilton tips #42, 89 or 134). Cut the lines into short pieces.


Tear drops:

The cutter you need for these is a little more difficult to make than the round one. This time, you'll need to invest about 5 minutes of your time. You need a piece of medium thick plastic (craft store or certain food packages). Cut out a rectangular piece of plastic, about 2,5x10 cm (1x4 inches). Pinch together the edges of the longer sides and secure them with a piece of clear tape. You'll end up with a 4-inch straw with openings in the form of a tear drop. Insert the blunt end of a wooden pick. This will be your ejector.
Cut out tear drops using the same technique you used with the circles.


Of course, if you have a decorating tip with a tear-shaped opening, by all means use that. I don't, unfortunately.

"Special shapes":
Unfortunately, I haven't come up with a way to make flowers, hearts or stars that don't rely on store-bought ejector cutters. So if you don't have any, you won't be able to make these. I included them here anyway, because they technically fit the term "homemade sprinkles".


The good news is that these ejector cutters aren't too expensive (between 9 and 19 Euros for a set of 3 or 4, respectively). However, the cutters small enough to make sprinkles only come in 4 shapes- heart, star, flower and clover. I only have the star and flower cutters.


I've mentioned above that you can also use cutters intended for use with polymer clay. Get these if you want. Not only are they cheaper than the kind produced specifically for fondant, the smallest size they come in is perfect for sprinkles.

To dry your sprinkles, simply leave them out on the parchment paper for a few days (depending on the humidity in your area). Alternatively, you can preheat your oven to 50°C (120°F), turn it off and put in the sprinkles on cookie sheets lined with parchment paper. Leave them in overnight. Store the dry sprinkles in screw-top jars or similar air-tight containers.

This is it. Easy, no? Now go ahead and make some sprinkles. Tomorrow I'll try to make tiny orange slice sprinkles. If it works, I'll let you know how to do it.